While driving is an everyday occurrence for many, the hazards faced on the road have been anything but eradicated. With the ubiquity of smart phones, which beg for our attention at any point in time, the dangers of participating in road traffic with distracted drivers and pedestrians have increased exponentially.
To address this issue, modern intelligent in-vehicle systems offer a remedy to mitigate some of these risks, serving as smart tools that use AI to help prevent accidents, enhance driver situational awareness, and function as ‘coaches’ to promote safer driving habits, both immediately and long term.
The VIA Mobile360 M800 SeriesIn-Vehicle Systems promote driver safety through actionable alerts with multiple AI features. With DSS (Driver Safety System) and ADAS (Advanced Driver Assistance Systems) functions, cameras and sophisticated algorithms are able to recognize dangers on the road and unsafe driving practices. These intelligent systems operate independent of a central network; therefore, they are able to deliver critical real-time alerts without latency or relying on connectivity.
With the DSS, smoking, phone usage, and fatigued or distracted driving trigger alerts that notify drivers to correct these unsafe practices. The systems’ ADAS incorporates FCW (Forward Collision Warning), which uses speed and proximity to vehicles ahead to set off warnings of a potential forward collision, LDW (Lane Departure Warning), which alerts the driver when the vehicle veers out of its lane, and BSD (Blind Spot Detection), which helps prevent accidents by detecting obscured vehicles or pedestrians in the vehicle’s blind spots. Together, these AI features work in tandem to help keep drivers on the road alert to constantly changing situation, at the same time preventing accidents and keeping everybody safe.
In the section below, we will show the easy steps to set up and calibrate the DSS and ADAS functions on a VIA Mobile360 M800 Series unit. You can also watch the video below, which follows the same steps highlighted in this article.
Before continuing with the DSS and ADAS calibration, be sure to complete installation of the DSS and four ADAS cameras in and around your vehicle. Camera placement, angle, and height will vary depending on the type of vehicle. For detailed information on how and where to install cameras, please refer to the VIA Mobile360 M800 Series Calibration Guide.
To complete the calibration process, you will need the supplied front and rear ADAS patterns, the left and right BSD calibration patterns, a handheld laser rangefinder or tape measurer, tape, marker or chalk, and a Windows PC with the VIA Mobile360 Calibration Tool software installed and connected to your unit.
DMS Camera Calibration
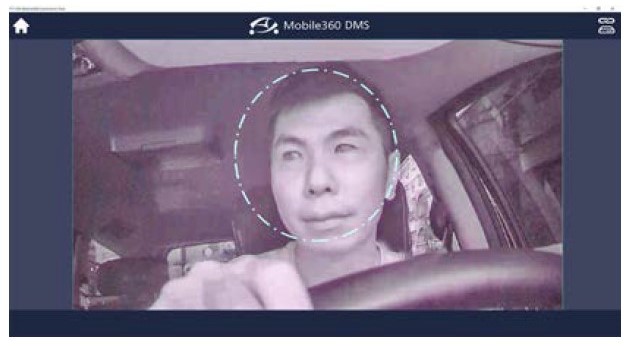
To begin the DSS camera calibration, select the ‘DSS’ icon from the home page of the VIA Mobile360 Calibration Tool. The live stream of the DSS camera with a circular overlay of the detection region will appear. Adjust the camera angle such that driver’s head is within the boundaries of the overlay, then click ‘Close’ to return to the home page of the VIA Mobile360 Calibration Tool. DSS camera calibration is now complete.
ADAS Calibration Pattern Placement
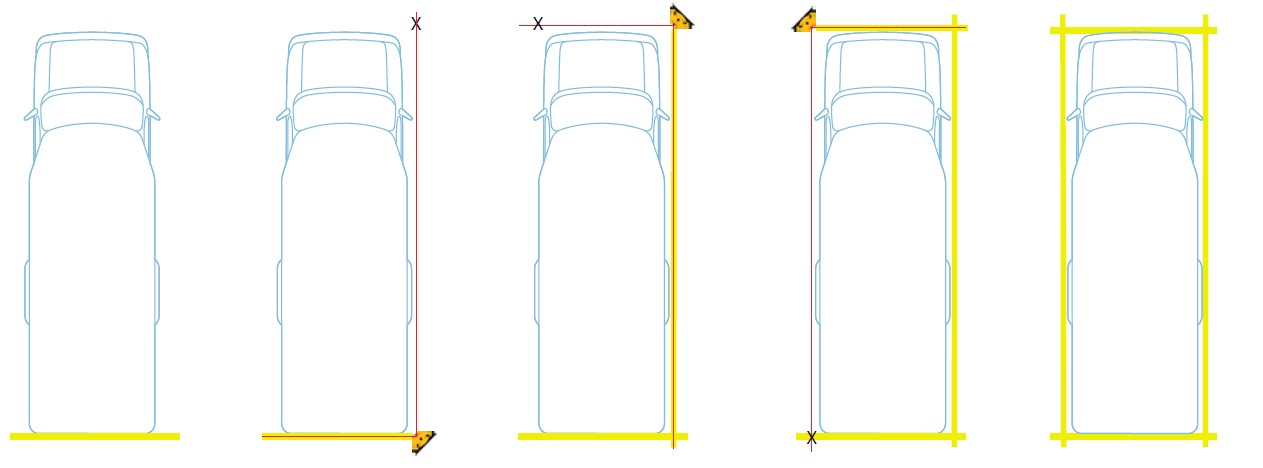
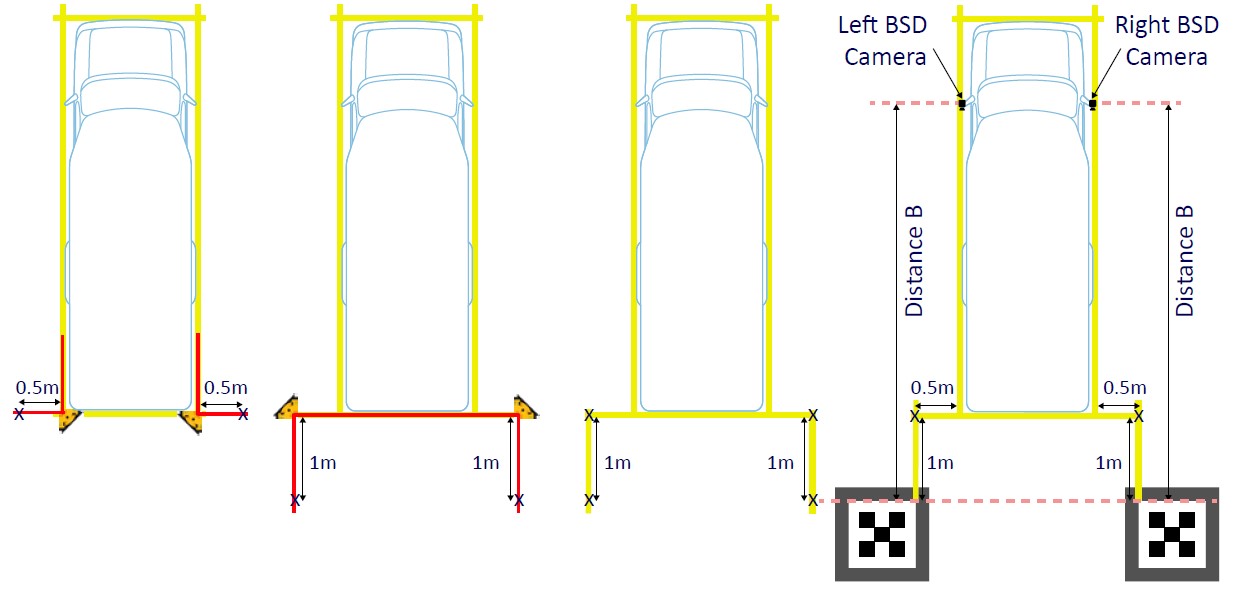
The ADAS calibration is a single process required to enable FCW, LDW and BSD features. Once the vehicle is parked in a suitable location (for example, a big parking lot), the first step is to create a rectangular frame around it. Start at the rear of the car and mark a line with tape or chalk on the ground that is parallel with the edge of the rear bumper. From the corner of the right rear bumper, use the 90° laser level to demarcate a line that extends to corner of the front bumper. Repeat the process around the other sides to finish boxing the vehicle. Now we are ready to place the calibration patterns.
To place the front and rear ADAS calibration patterns you will first need to calculate the required distance from the vehicle to each pattern, which will vary depending on a vehicle type. Please refer to the VIA Mobile360 M800 Series Calibration Guide for detailed instructions on how to calculate the front ADAS pattern placement distance – ‘Distance A’, and the rear ADAS calibration pattern distance – ‘Distance C’.
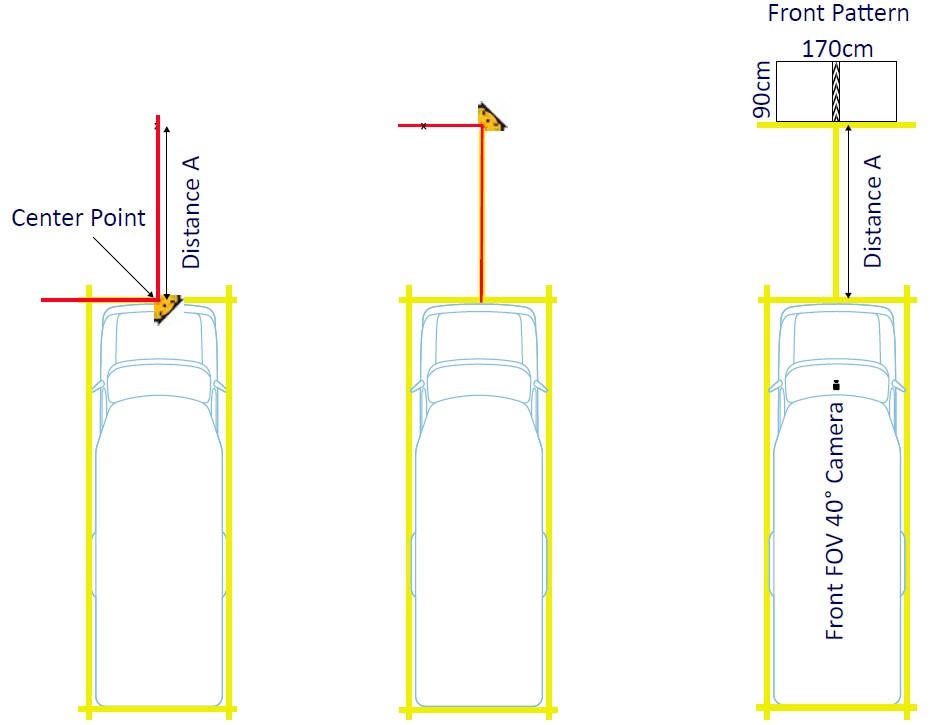
To begin the front ADAS calibration pattern placement, start from the center point of the vehicle’s front bumper and mark a perpendicular line which equals the calculated ‘Distance A’. From this point create a parallel line to the vehicle’s rear edge, then place the front ADAS pattern so that the center of the pattern is placed on the center point mark and the front edge is parallel with the line (please refer to the figure below).
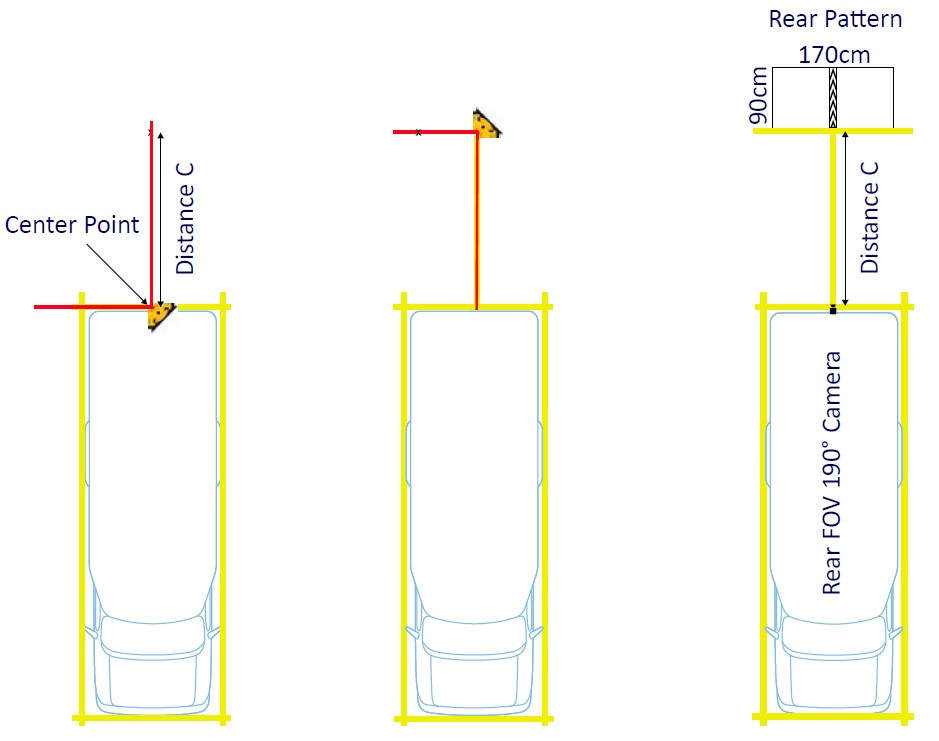
Repeat the same process for the rear ADAS calibration pattern, only this time using ‘Distance C’ from the rear bumper to place the pattern.
Next we will place the left and right BSD calibration patterns. From a rear corner of the drawn box, measure 50cm beyond the rear bumper, starting either with the left or the right side of the vehicle. From this point, draw a perpendicular line, 100cm behind the vehicle. From this point, place the corner of the BSD calibration pattern, making sure the edges of the pattern are in line with the vehicle. Repeat this process for the other side. Now, measure ‘Distance B’ – the distance from the BSD cameras to the leading edges of the BSD calibration patterns.
Front ADAS Camera Configuration
To begin camera calibration, establish a remote connection between the VIA Mobile360 M800 Series system and the VIA Mobile360 Calibration Tool. Select the ‘ADAS’ icon from the home page, then select ‘New Calibration’ to begin the ADAS calibration process. The ‘Preview’ tab will display live feeds from each connected ADAS camera.
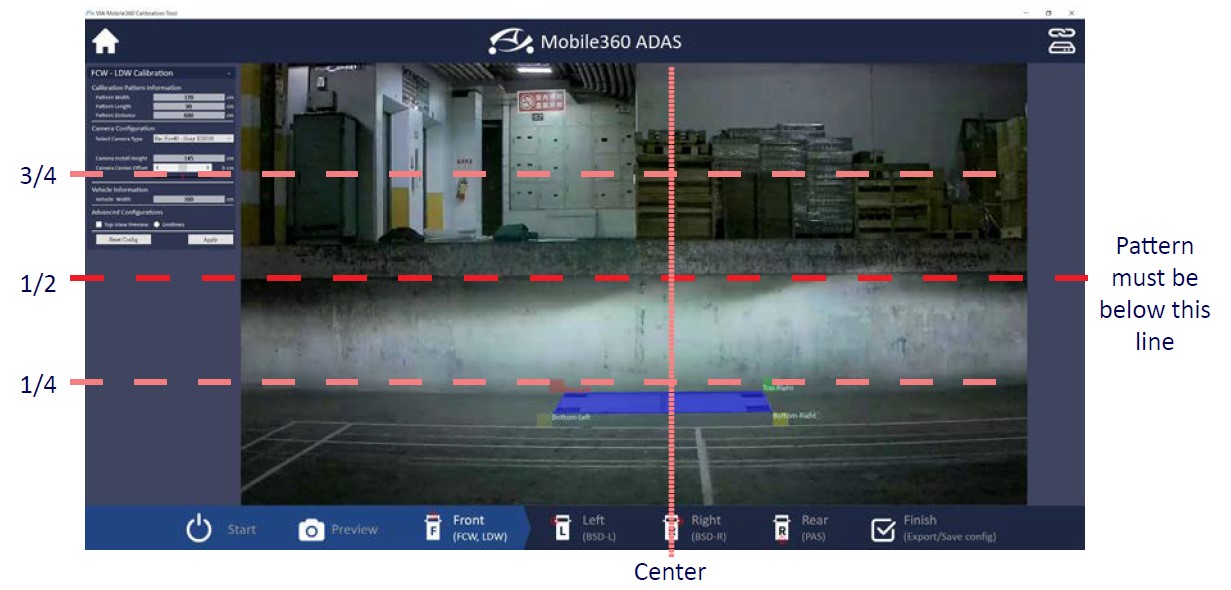
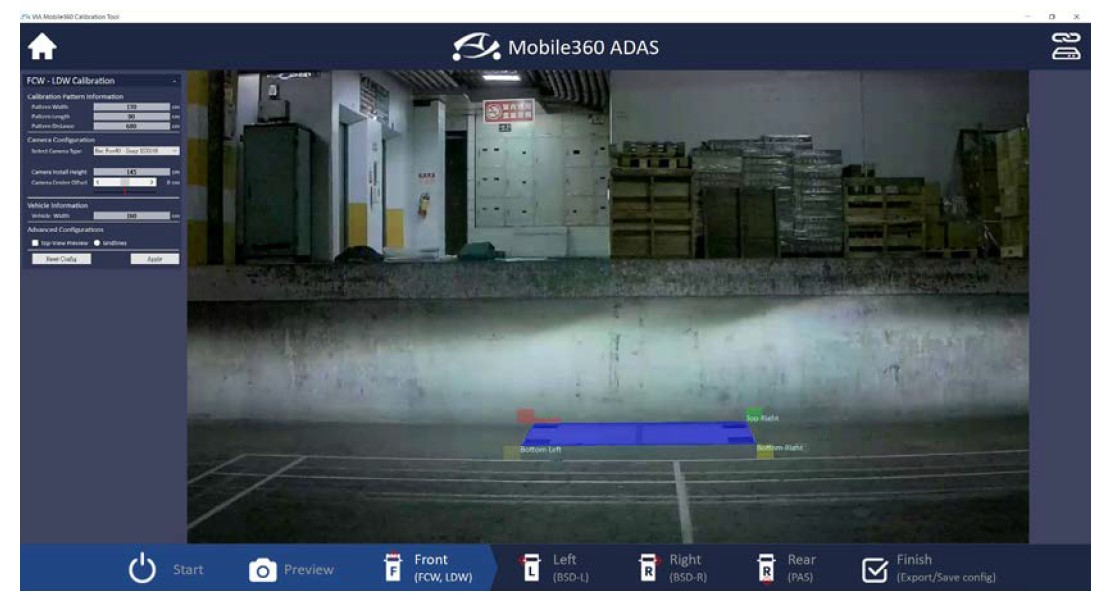
To calibrate the front ADAS camera for LDW and FCW, click on the ‘Front (LDW/FCW)’ icon along the bottom of the screen. The front ADAS calibration pattern should be centered in the lower half of the screen. If the camera is positioned correctly, drag each corner of the blue overlay square to the corresponding corner of the pattern in the camera feed. The red square of the overlay should be anchored to the top left corner of the pattern, the green square – to the top right corner, the yellow square – to the bottom right, while the orange square – to the bottom left.
Once the four anchor points have been set correctly, fill in the required ‘Calibration Pattern Information’, ‘Camera Configuration’, and ‘Vehicle Information’ values in the window on the left-hand side of the screen, then click ‘Apply’ to save the values.
BSD Camera Calibration
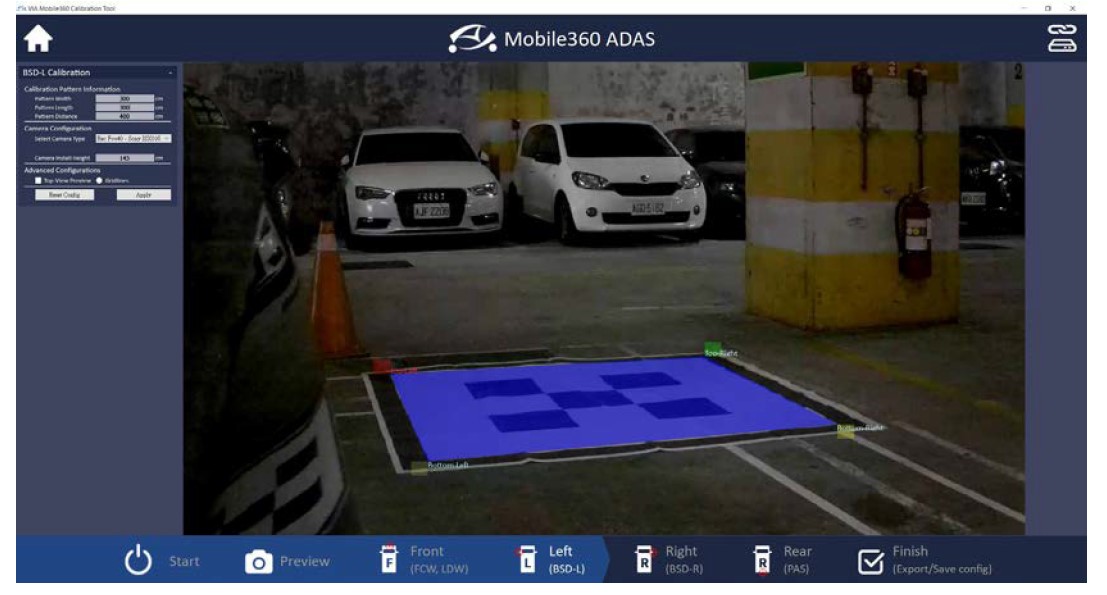
After completing the front ADAS Camera calibration, select the ‘Left (BSD)’ icon along the bottom of the screen. Ensure that the camera is positioned such that the pattern can be clearly seen, and the camera view is not obstructed by the side of the vehicle. Adjust the camera manually if necessary.
Drag each corner of the blue overlay square to the corresponding corner of the pattern in the camera feed. Please refer to the Font ADAS Calibration steps for anchor placement sequence.
Once the four anchor points have been set correctly, fill in the required ‘Calibration Pattern Information’, ‘Camera Configuration’, and ‘Vehicle Information’ values in the window on the left-hand side of the screen, then click ‘Apply’ to save the values. Next, select the ‘Right (BSD)’ icon along the bottom of the screen and repeat the process.
Rear ADAS Camera Calibration
To begin the process, select the ‘Rear (PAS)’ icon along the bottom of the screen. Please refer to the Front ADAS Camera Calibration instructions above and follow the same steps.
Click ‘Finish’ and select ‘Save Configuration’. Next, click the ‘Home’ icon in the top right corner of the screen to close the ADAS calibration assistant. Congratulations, now both DSS and ADAS functions are calibrated on your VIA Mobile360 M800 Series In-Vehicle System!
With the AI functions of the VIA Mobile360 M800 Series In-Vehicle System enabled, drivers gain a wealth of features that make vehicle operation easier and safer. By delivering actionable alerts in real-time, a VIA Mobile360 M800 Series In-Vehicle System serves as a powerful safety measure to mitigate the dangers on the road – a welcome addition to any driver’s toolbox.
